
Overview
The Excel LAMBDA function is used to create custom, reusable functions in Excel. Through use of LAMBDA, you’re able to assign a name to the function you create and then use it throughout the workbook, like any other native Excel function.
Syntax
=LAMBDA([parameter1, parameter2, …], calculation)
Arguments
parameter – [optional] Any value that you want to input into the function.
calculation – The calculation that is performed on the inputs of the function.
Version
Excel 365
Purpose
The LAMBDA function allows you to create a custom function that you can use throughout the workbook, similar to native Excel functions. LAMBDA functions can be as simple as adding two cell references together, or as complicated as tying multiple Excel functions together. The best part of the LAMBDA function is that VBA development is not required. Prior to the LAMBDA function, VBA code would be necessary to create custom Excel functions. The LAMBDA function solves this problem.
While the LAMBDA function is useful on its own, it is typically used together with the LET function. LET allows for a means to assign values and declare variables in a formula. As such, combining the LET and LAMBDA functions allow for easier-to-read syntax through reducing redundant code.
=LAMBDA(parameter1, calculation) // creates a function
Examples
Let’s look at a few examples of how we can use the LAMBDA function.
In this first example, we’ll start by writing out the function we want to include in our LAMBDA. This would typically be the first step when going to create a LAMBDA, as it ensures your syntax is correct. So let’s create a basic formula to add variables ‘A’ and ‘B’ together:
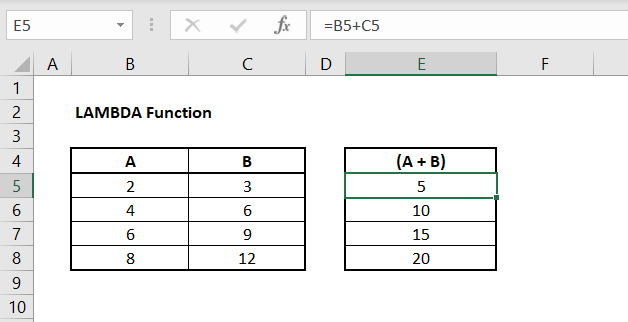
The formula we have in cell E5 (and apply to the cells below) is:
=B5 + C5
We can see that the formula works as expected, where we have 2 + 3 = 5. This holds true for the cells below as well. Our next step would be to move this formula into a LAMBDA. We can see what this looks like below:
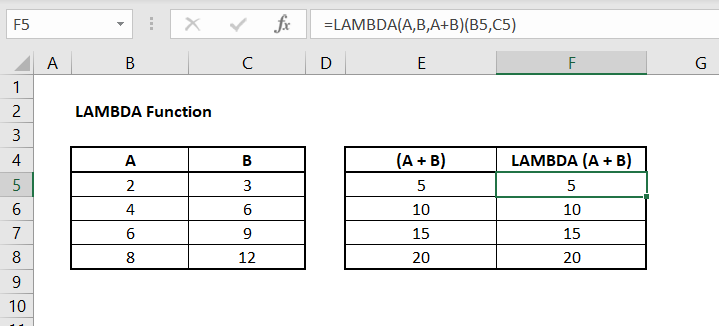
The formula we have in cell F5 is:
=LAMBDA(A, B, A+B)(B5, C5)
Let’s break this syntax down. In order to use a LAMBDA, we need to know our input parameters and our calculation to be performed. In this case, ‘A’ and ‘B’ are our inputs. We can see what that looks like below:
=LAMBDA(A, B) // our input parameters
Next, we need to include the calculation that we want to perform on ‘A’ and ‘B’. We get:
=LAMBDA(A, B, A+B) // A+B is our calculation
Lastly, we need to pass values into the arguments ‘A’ and ‘B’. Like any other Excel function, there needs to be data for Excel to perform a calculation on. In this example, we have data in columns B and C, so we’ll reference them:
=LAMBDA(A, B, A+B)(B5, C5) // B5 & C5 are the input data
At this point, we’ve created a LAMBDA function with two input parameters, ‘A’ and ‘B’. We’ve told the LAMBDA to add the two values together with our calculation ‘A+B’. Lastly, to give the function something to calculate, we’ve passed the data in cells B5 and C5 into the function.
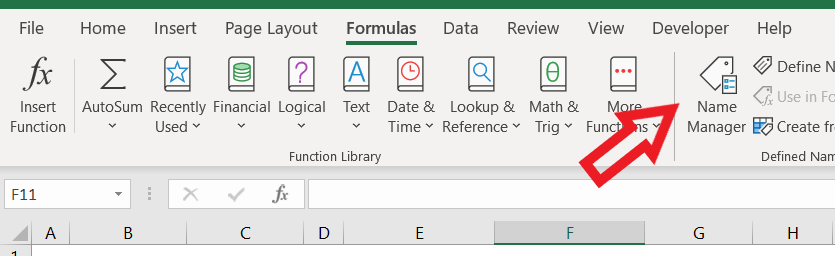
Since we can see the LAMBDA works as expected, we can move onto the final step, which allows for the LAMBDA to be re-used across the workbook. To give the LAMBDA a name, we need to use the Name Manager within Excel. First, let’s copy the LAMBDA formula to our clipboard – do not copy the input data parameters. To open the Name Manager, use the shortcut Ctrl + F3 (or navigate to ‘Formulas’ on the Ribbon Tab and click Name Manager under the ‘Defined Names’ Ribbon Tab Group).
Click ‘New…’:
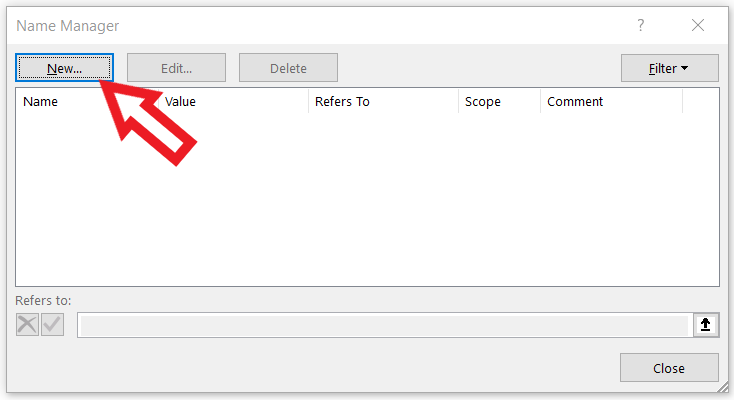
In the ‘New Name’ dialog box, enter a Name for your new function. For this example, we’ll call our function ‘APB’, for A Plus B. The ‘Scope’ can remain as Workbook and the ‘Refers to’ will be our LAMBDA function that we copied to our clipboard:
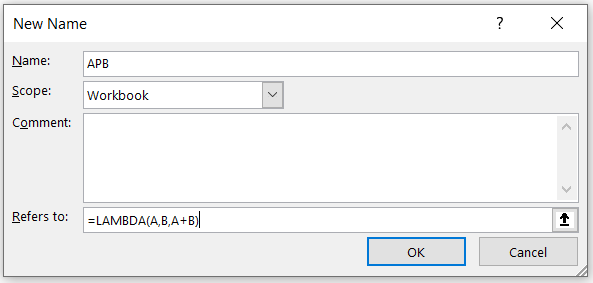
Hit ‘OK’ and you’ve now assigned a name to your LAMBDA function. At this point, it can be used like any other function in Excel. Testing it out, we get:
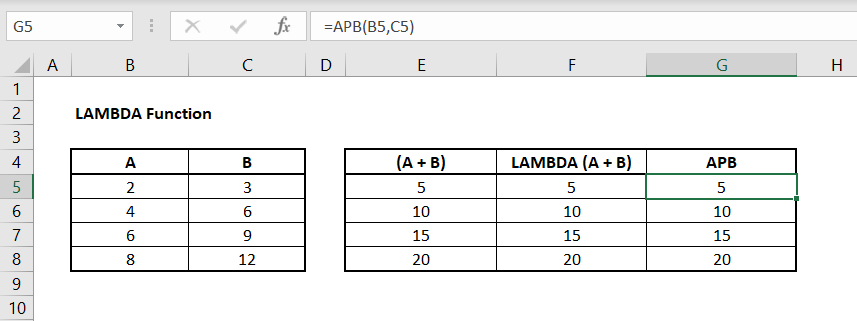
The formula we have in cell G5 is:
=APB(B5, C5)
Given that our new function only adds two values together, it may be faster to type out ‘B5 + C5’ in this specific instance. However, let’s take a look at a slightly more complicated example, which demonstrates the power of the LAMBDA function.
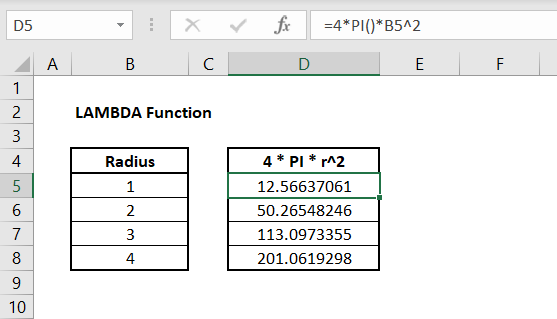
In this next example, let’s look at how we can quickly calculate the surface area of a sphere through using the LAMBDA function. We know the formula to calculate the surface area of a sphere to be:
=4*PI()*r^2 // 4 * PI * radius squared
Knowing this, we can test out the above formula on some sample data:
Similar to the example above, we can now move this formula into the LAMBDA function, with the radius being our only input parameter. The LAMBDA function would look like:
Using the name manager again, we can create a new Name that refers to the LAMBDA function we just created. Let’s title this new Name ‘SurfaceAreaSphere’ and close out of the name manager. Using this new function we’ve created, we get the following result:
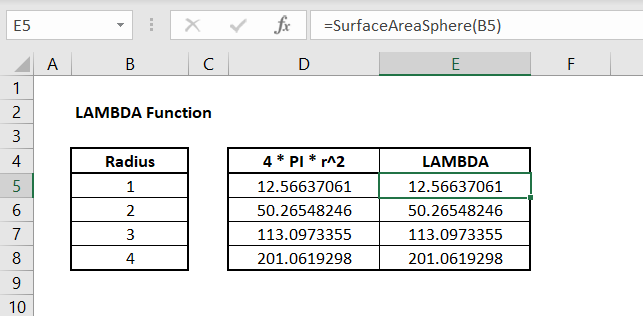
With this example, we get a better sense of the value of the LAMBDA function. Instead of having to type out the syntax for calculating the surface area of a sphere, we can call a custom function that we’ve already created and simply reference or enter a radius value for the function to evaluate.
Notes
- The LAMBDA function can support up to 253 parameters
- If more than 253 parameters are used, Excel will return a #VALUE! error
- LAMBDA names and parameters follow existing Excel syntax rules for names with the addition that you cannot use periods (.) in parameter names
Author

Kyle Stott
Certified Microsoft Excel Expert
Kyle has worked professionally with Microsoft Excel for over a decade and has been consulting on and teaching best practices in Microsoft Excel to over 400 companies across 30+ countries.
Want to learn more?
Join My Excel Academy Today!
This All-Access Pass Includes:

- Access to All My Excel Academy Courses
- 20+ hours of on-demand video
- 1-on-1 instructor support
- Mobile learning supported
- Frequently updated content
- Learn at your own pace
- 500+ practice problems
- Certificate of completion
30-Day Money-Back Guarantee
Want to learn more?
Join My Excel Academy Today!
All-Access Pass Includes:
- Access to All My Excel Academy Courses
- 20+ hours of on-demand video
- 1-on-1 instructor support
- Mobile learning supported
- Frequently updated content
- Learn at your own pace
- 500+ practice problems
- Certificate of completion
30-Day Money-Back Guarantee
Want to learn more?
Join My Excel Academy Today!
30-Day Money-Back Guarantee
This all-access pass includes:
- Access to all My Excel Academy Courses
- 20+ hours of on-demand video
- 1-on-1 instructor support
- Mobile learning supported
- Frequently updated content
- Learn at your own pace
- 500+ practice problems
- Certificate of completion
Don’t hesitate – join now!